Table of contents
Git Terminologies
Branch:
A branch is a version of the repository that diverges from the main working project. It is a feature available in most modern version control systems. A Git project can have more than one branch. These branches are a pointer to a snapshot of your changes.
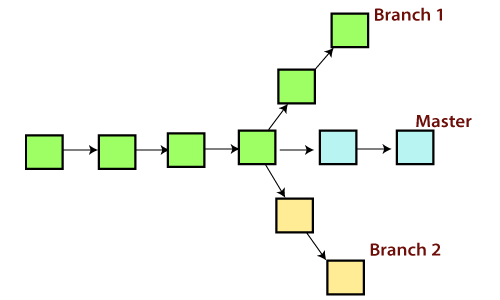
Master Branch: The master branch is a default branch in Git. It is instantiated when the first commit is made on the project. When you make the first commit, you're given a master branch to the starting commit point. When you start making a commit, the master branch pointer automatically moves forward. A repository can have only one master branch.
Create Branch
$ git branch <branch name**>**
List Branch
$ git branch
Delete Branch
$ git branch -d**<branch** name**>**
Switch Branch
$ git checkout**<branch** name**>**
Merge Branch
$ git merge <branch name**>**
- Clone:
In Git, cloning is the act of making a copy of any target repository. The target repository can be remote or local. You can clone your repository from the remote repository to create a local copy on your system.

Git clone command :
$ git clone <repository URL**>**
Git Clone Branch:
$ git clone -b <Branch name**><Repository** URL**>**
- Fetch:
It is used to fetch branches and tags from one or more other repositories, along with the objects necessary to complete their histories. It updates the remote-tracking branches.
Scenario 1: To fetch the remote repository:
git fetch< repository Url>
Scenario 2: To fetch a specific branch:
- $ git fetch <branch URL><branch name>
HEAD:
HEAD is the representation of the last commit in the current checkout branch. We can think of the head like a current branch. When you switch branches with git checkout, the HEAD revision changes, and points the new branch.
$ git show HEAD
Index:
The Git index is a staging area between the working directory and repository. It is used as the index to build up a set of changes that you want to commit together.
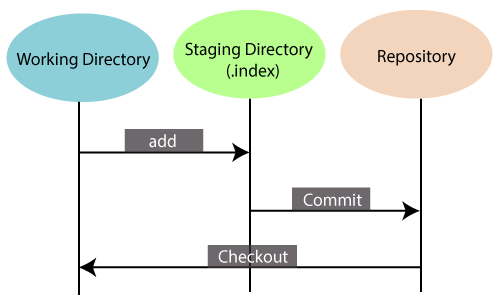
Working Directory: When you worked on your project and made some changes, you are dealing with your project's working directory. This project directory is available on your computer's filesystem. All the changes you make will remain in the working directory until you add them to the staging area.
Staging Area: When you create a git commit, Git takes changes that are in the staging area and makes them a new commit. You are allowed to add and remove changes from the staging area. The staging area can be considered as a real area where git stores the changes.
Repository: Repositories in Git are considered as your project folder. A repository has all the project-related data. Distinct projects have distinct repositories.
$ git status
Git Pull:
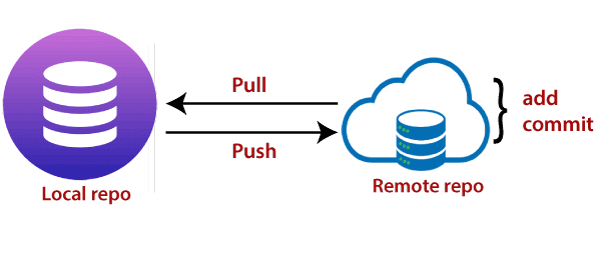
The term pull is used to receive data from GitHub. It fetches and merges changes from the remote server to your working directory. The git pull command is used to pull a repository
$ git pull <option> <repository URL>
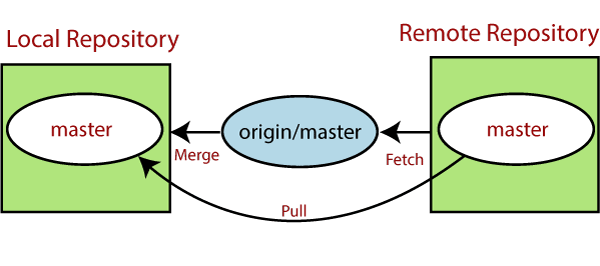
Git push:
The push term refers to upload local repository content to a remote repository. Pushing is an act of transfer commits from your local repository to a remote repository
$ git push <option> <Remote URL><branch name>
Git Revert:
The git revert command is used to apply revert operation. It is an undo type command, however It does not delete any data in this process; instead, it will create a new change with the opposite effect and thereby undo the specified commit. Generally, git revert is a commit.
- $ git revert
Git Reset:
The git reset command is used to reset the changes
Git Origin:
In Git, The term origin is referred to the remote repository where you want to publish your commits. The default remote repository is called origin
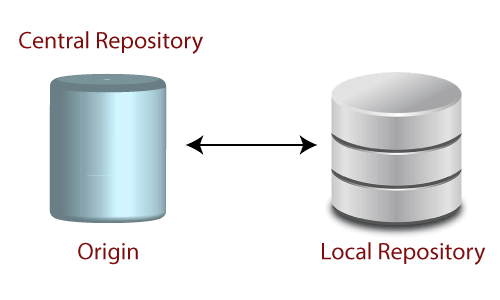
Some commands in which the term origin and master are widely used are as follows:
Git push origin master
Git pull origin master
Git Rebase:
In Git, the term rebase is referred to as the process of moving or combining a sequence of commits to a new base commit. Rebasing is very beneficial and it visualized the process in the environment of a feature branching workflow.
It is good to rebase your branch before merging it.

Now perform the rebase command as follows:
$git rebase <branch name**>**
If there are some conflicts in the branch, resolve them, and perform the below commands to continue changes:
$git rebase --continue
Git Stash
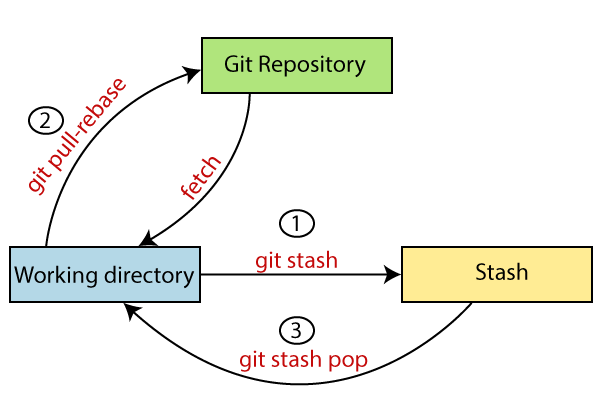
Sometimes you want to switch branches, but you are working on an incomplete part of your current project. You don't want to make a commit to half-done work. Git stashing allows you to do so. The git stash command enables you to switch branches without committing to the current branch.
The below figure demonstrates the properties and role of stashing concerning the repository and working directory.
To check the current status of the repository, run the git status command.
$ git status

From the above output, you can see the status that there are two untracked file design.css and newfile.txt available in the repository. To save it temporarily, we can use the git stash command.
$ git stash

In Git, the changes can be stashed with a message. To stash a change with a message, run the below command:
$ git stash save "<Stashing Message>"

To check the stored stashes, run the below command:
$ git stash list

Git Cherry-pick:
Cherry-picking in Git stands for applying some commit from one branch into another branch. In case you made a mistake and committed a change into the wrong branch, but do not want to merge the whole branch.
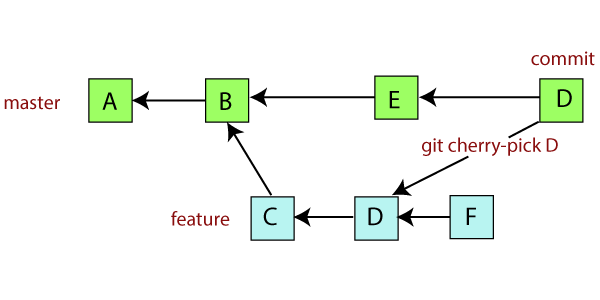
Why Cherry-Pick
Suppose you are working with a team of developers on a medium to large-sized project. Some changes are proposed by another team member and you want to apply some of them to your main project, but not all. Managing the changes between several Git branches can become a complex task, and you don't want to merge a whole branch into another branch. You only need to pick one or two specific commits. To pick some changes to your main project branch from other branches is called cherry-picking.
Some scenarios in which you can cherry-pick:
Scenerio1: Accidently make a commit in the wrong branch.
Git cherry-pick is helpful to apply the changes that are accidentally made in the wrong branch. Suppose I want to make a commit in the master branch, but by mistake, we made it in any other branch. See the below commit.

In the above example, I want to make a commit for the master branch, but accidentally I made it in the new branch. To make all the changes of the new branch into the master branch, we will use the git pull, but for this particular commit, we will use git cherry-pick command. See the below output:
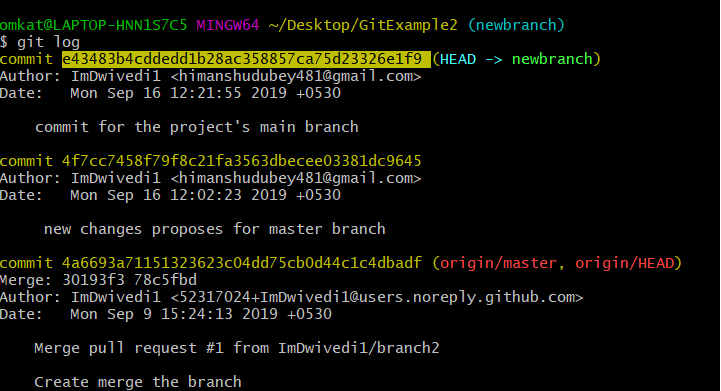
n the given output, I have used the git log command to check the commit history. Copy the particular commit id that you want to make on the master branch. Now switch to the master branch and cherry-pick it there. See the below output:
$ git cherry-pick <commit id>
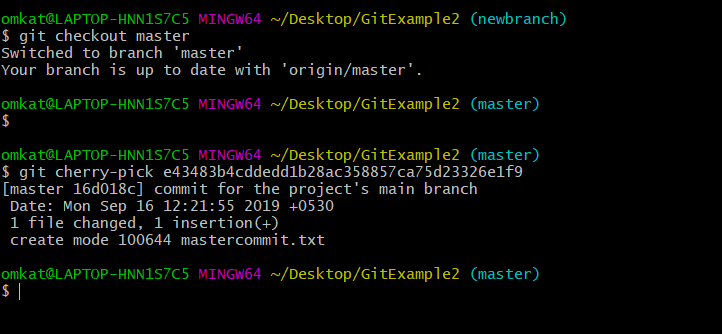
From the given output, you can see that I have pasted the commit id with git cherry-pick command and made that commit into my master branch.
